1).Create user Account with same name and password on both computers. Make sure File Sharing is enabled on the local area connection between the server. Also enable file sharing in Firewall.
2. Now create a folder named “bkp” on both servers.
3. On the both Servers share bkp folder with full accsess permission. Allow the “user”access permission on bkp on both the servers
5).Now go to Control Panel->Administrative Tools->Services and find the SQL Server Agent service. Go to its properties and set “user” as the account on the Logon tab. Restart the service. Do this on both servers.

7.Take full backup as follow :
1)Right click on database which you want to backed up select “TASK” option and then
“BACKUP” option.
ii)Select the option and give the format.It will help you to backup other then
default path of backup.

iii) add the path location where you want to take backup.

8. Take the backup of transaction log as follow.
I) Right click on database which you want to backed up select “TASK” option and then
“BACKUP” option. Select the transaction log from backup type.
iii)Select the option and give the format.It will help you to backup other then
default path of backup.
NOTE: when taking backup of transaction log manually then don't use trn extension
use .tra .extenstion .it will effects the procedures created for monitoring.
User tra

iv) add the path location where you want to take backup.

9. Copy the backup into c:\bkp the location of the second server (Secondary Server)
10. then restore the database as follow :
I) Select database Right click select “RESTORE DATABASE” option.

ii) select thelocation where you have copied full backup on the secondary server of primary server

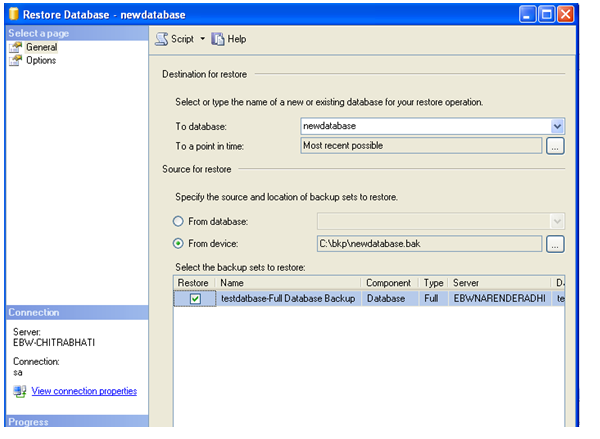
ii) select the option and select Select Restore “WITH STANDBY “ Option

11. Apply the transaction log in as given below
I) select the databse which you restored from full backup Right clik on it and select
“TASK” option and then “RESTORE” and “TRANSACTION LOG” after that.

i)select the location where you have copied transation log backup on the secondary server of primary server
iii) select the option and select Select Restore “WITH STANDBY “ Option
12. Now have to create STANDBY DATABASE on secondary server
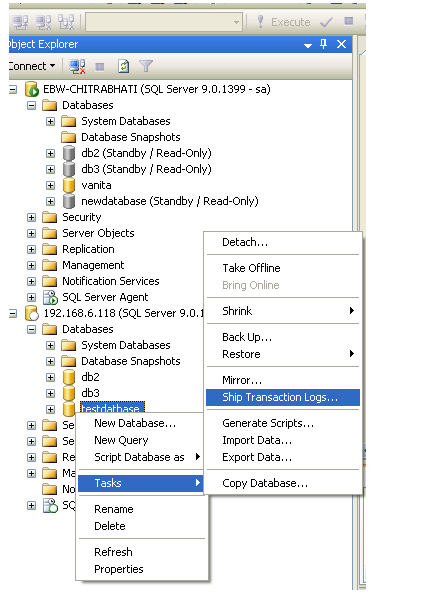
13. To start log sipping from primary server select the option as follow
i)Right click on database for which you want to create STAND BY
ii)select “TASK “ and then select “ SHIP TRANSATION LOGS”
iii)Select this as a primary Database option

iv)Give the full path of the primary server from where logs have been generating

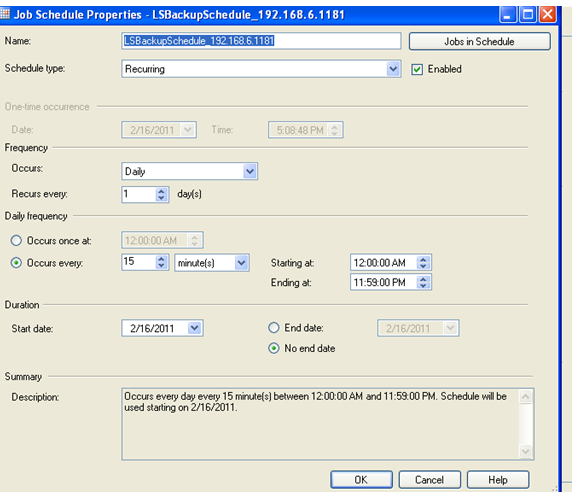
v)You can change the job scheduler on click the “SCHEDULER “ tab
and set the retention parameters for backup piece have to delete on secondary server .
connect to the secondary server using ”CONNECT TAB”

select the e Destination of the Secondary Server where you want to copy log transaction backup

ii)Use Standby mode with Disconnect users in the database when restoring backup.


Job have been created .
14. Every thing is fine if you will see One Job LSBackup on Primary Server

15.And Two Jobs LSCopy , LSRestore on Secondary Server

16.Then start the jobs in the sequence LSbackup,LScopy,LSRestore (they are schedule other way)

17.You can see job history if any problem accrue

